This is a guest post from Jyles who, in his spare time, built his own off road skates. Take it away Jyles.
Have you ever wanted to try a new extreme sport and can’t, or you don’t want to spend the thousands of dollars these sports seem to cost? I have. In fact, I have those feelings all the time. So, here are my efforts, in the spirit of Z-boys of Dogtown (D.I.Y. skateboarders), to create my own version of a summer downhill skiing experience.
I love skiing, I will happily ski everyday in the winter. I ski the first 1 inch dusting in fall and I ski the highest elevations till late spring. I wish I could ski year round…. One day I thought why not? There’s got to be a product out there for that purpose. I’d heard of the road skis for practicing cross country skiing, but the wheels are tiny and there’s no way they’d survive a cliff drop. After pouring over the web I found great opportunities for All Terrain Boarding (Snowboarding in summer), but there’s little out there for skiers.
Here’s what I learned
Summertime downhill skiing isn’t a completely new concept. It’s been around a couple decades. It hasn’t gained a lot of popularity, equipment is hard to come by, and impossible to rent for a day to see if you like it.
The 4 most impressive models for summertime downhill skiing I saw online were:
1. Grass Skis
A track, like a tank tread, is under each foot. My problem with these is the need for a very smooth skiing surface. You can’t go off piste. I like that you wear regular ski boots. Oh yeah… no brakes!
2. Coyote Rollerblades
Three 6 inch wheels per foot, solid boots, and the Rollerblade brand name to back them up, however they aren’t manufactured anymore and are hard to find.
3. Gate Skates
skates.com/Off-road-skate-p/21lg.htm
Two 8 inch wheels per ski spaced about 2 1/2 feet apart. These look to be better suited for bumpy terrain, but have limited ability to turn, wheel base is too far apart. Strapping right in with sneakers seems to be questionable for stability. Comes with brakes.
4. Terrablades
Four 7.5 inch wheels per ski, mounted inline. These seem to match my needs exactly. Big wheels for bumpy terrain, ski boot mounts, tighter wheel configuration for better turning, and brakes. The company is 1500 miles away so I couldn’t test a pair before buying. Starting at $850.00 seems reasonable, but I wasn’t prepared to make a purchase without testing first.
I was pumped.
I’m a carpenter and have a decent amount of tools, so why not build a pair myself?
I decided to try building the 2 wheel per ski design and just buy more wheels and modify the design later if I wanted to add wheels. I scoured the internet for cheap 8 inch pneumatic wheels and found replacement wheels for a dolly, $20 each with bearings. 4 wheels $80. Perfect.
When the wheels came in the mail, I went to my favorite hardware store. This hardware store has everything, its been in one family for 60 years, the floor has never been swept and the store is so disorganized and packed full you have to turn sideways to get through some of the aisles. I spent a few hours in the basement digging through stuff till I found what I needed to build the base for the skis.
3/4 inch 3 sided square aluminum channel and a handful of nuts and bolts.
I grabbed a 3/4 inch by 3.5 hardwood board and made a 2 foot base to mount ski bindings. I sandwiched the wood with the aluminum channel so it ran past 6 inches on each end. Drilled holes in the aluminum, put in the bolts for axles and added wheels. Add a few wood screws to hold it all together and viola. What could go wrong?
I headed out to a small hill on a dirt road for my first test.
I immediately realized that I have to physically lift my feet to change direction, no pivoting on that wheel base. The ride was nice and smooth but it felt nothing like skiing.
[youtube id=”eIuS8m0trjM” width=”600″ height=”350″]
Next test I went to an abandoned ski resort near my house and tried riding the jeep trail that zig-zags to the top. I rode the bottom for a little while with out much trouble. I was actually starting to get the hang of stepping each turn. I headed up to the top where it gets a little steeper and bumpier and that’s where it all went downhill. Pun intended.
The first part is fairly steep and there is loose gravel, I was very nervous and came up with an emergency stop plan. Jump and turn so I slide sideways. I took a few deep breaths and headed down. I was going uncomfortably fast in about three seconds, so I pull the emergency brake plan. It worked beautifully…. but the aluminum channel twisted from the sideways pressure and my wheels now faced the wrong direction…. it was a long disappointing walk down. Upon further inspection I find that the wood started to split along the grain where the aluminum was attached.
Back to the drawing board.
I need materials strong enough a to handle my demands. I want to rip it up! I could go rollerblading if I want to have a gentle ride on smooth surfaces, but no, I want to ride anything a mountain bike can, and I want to do it fast and with at least some control.
I head back to the hardware store and dig through more boxes, drawers and barrels. I find hollow square steel rods and I find barn door hinges and $100 later I’m headed home to build version 2. Unfortunately version 2 looked way cooler than it actually functioned. The changes from version 1 are:
- The hardwood became two layers of 1/2 pressure treated plywood
- The aluminum became steel and only stuck out in the front to catch the front wheel
- The rear wheel was set up as a swivel wheel and was supposed to allow me to shift my weight and steer.
- The weight doubled
- They looked awesome
I spent hours getting everything just right. I shaped metal, sanded down the edges of the plywood, I even rounded the edges of anything metal to avoid sharp edges. Everything was precise and exactly how I envisioned it, however… Version 2 never hit the slopes. My first trials on the gently sloping dirt road were complete failures. I had no control and they weighed a ton.
I gave up during ski season, I was too busy.
Ski season ended in May and I jumped right into version 3. I gave up on the two wheel per ski design and concentrated on making a light weight but sturdy 4 wheel per ski design. I read everything I could about the Terrablades, I studied the pictures on the website and decided I could basically copy those.
I needed more wheels and I needed to get lighter wheels. The dolly wheels could bear 250 pounds per wheel and were very solid, but they weighed a lot.
I considered buying 7 or 8 inch pneumatic wheels but decided on 4 1/2 inch solid wheels intended for skateboards. $90 for 8 wheels and bearings. The larger wheels were triple the price.
I went back to the hardware store and got more hollow square steel and the right size bolts to use for wheels axles, as well as some nylon spacers to hold wheels in one spot and a few more bolts to hold a plywood deck on to the square steel frame. $75
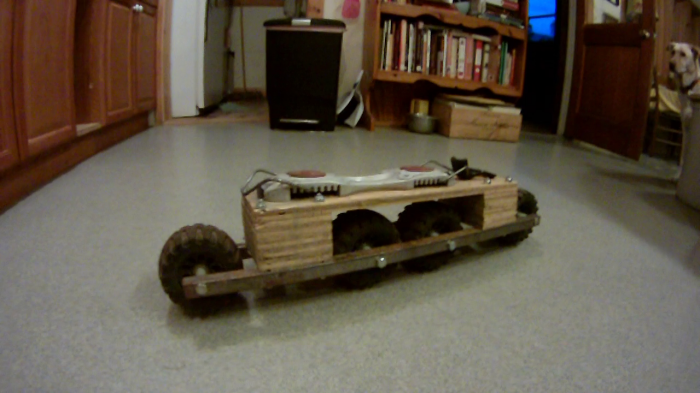
The basic design per ski is:
- Two pieces of steel set parallel.
- Holes are drilled in the steel to allow an axle though and 4 wheels are set between the two pieces of steel.
- Risers come up out of the steel and hold up a simple plywood base with the ski binding mounted to it. The ply wood is just a half inch above the wheels.
- Everything is braced and triangulated for maximum stability and to ensure that the ski responds to my movements.
I switched to a lighter ski boot binding (snow blade boot bindings). No quick release, but the skis are so short I don’t think I’ll have any trouble.
I read about the Terrablades having a slightly rockered wheel base, like ice hockey skates. The part directly under foot touches while the front and back gently rise up off the ground. This offers an ability to turn very easily (like pivoting) and provides an initial rise to get over bumps. I used this feature. The two center wheels are under foot and are a quarter inch closer to the ground. The front and back wheels act as training wheels for forward and back stability.
My design is severely lacking in professionalism compared to the Terrablades and we have some differences, but the basic design is similar.

These work like a dream!!!
I can steer.
At low speeds I can whip them around for a sliding stop (I fall over every time, but at least the skis hold together).
They don’t weigh a lot. They are sturdy. It feels like skiing. I’ve hit 30+ MPH. Dropped a 3-foot stone wall into grass.
Roads, hiking trails, jeep trails, mountain bike trails. These things can ride over anything.
I’m hooked.
I doubt I’ll adopt the Terrablades slogan: ‘let it melt’, but I’m very happy to feel like I can ski year round.
I spent a few hundred dollars instead of a thousand and I’m proud to say I built the things I’m riding.
Though, I still have to figure out how to attach some brakes…
- An Anatomically Correct Nut Tool for Climbers - 5 June, 2015
- Obstacle Race Training Guide - 4 June, 2015
- Using Night Vision in Extreme Sports - 25 March, 2015
I have lived in Stowe Vermont my whole life and have been skiing since I was 2 years old. I have been doing a ton of hikes this summer and a lot of the off slope woods trails are spots I hit in the winter. I have been craving to ski again and figured someone must have invented summer skis by now. I found a few sites (including some of the ones you mentioned) but a lot no longer sell them or sell the smooth grass track type (I need off road skis). These seem like a great idea and I was wondering if you’ve had any problems or made any more adjustments? I’m craving skiing pretty badly right about now haha
Thanks,
-Nick
Hi,just read your building, awesome. I did try grass skiing with the rollka type skis probably 20 years ago but all the parks and gear has just dissapeared here in Australia, I was contemplating building my own skis for off road as our season has just finished and I’m still itching for slope action, do your version actually turn like skis?