Blog

  • Wakeskating the Erie Canal

    Wakeskating the Erie Canal

    Professional Wakeskater and Red Bull Athlete Brian Grubb Tackles Historic Waterway, Taking the Sport to New and Compelling Places

    What once served as a connector for the Atlantic Ocean to the heartland of America, now serves as a site for the next level of watersports. Professional Wakeskaters Brian Grubb and Andrew Pastura took their skills to the now-retired lock system and surrounding areas of Western New York’s Erie Canal in order to challenge themselves while honoring a piece of US history.

    Still relevant but modernized, a lock is a device used for raising and lowering boats between stretches of water with varying levels on river and canal waterways. The Lockport, New York, Locks are the most significant historic site from the Erie Canal era that is still in operating condition. Drawing tens of thousands of visitors to the Niagara region per year, the Lockport Locks Heritage District is on it’s way to be one of three North American restored 19th Century canalways currently in existence.

    Wakeskating, an adaptation of wakeboarding similar to skateboarding on water, is a sport usually reserved for riding behind boats, going off man-made rails, pipes and kickers located in lakes and flat bodies of water across the country. The vast lakes and outdoor activities of the Western New York and Great Lakes Region in the summer months give the young sport a home amongst locals but “popping” off the antiquated-but-not-forgotten locks has never been done before.

    Red Bull Athlete Brian Grubb, who is considered an innovator and pioneer in the sport of wakeskating, spent ten years of his life in the New England area. He’s won numerous championship titles and brought the sport to the ends of the earth, including the rice patties of the Philippines, the swamps and bayous of New Orleans, the Cranberry Bogs of Wisconsin and the Kimberly Region of Western Australia. He, along with friend and leader of the next generation of wakeskaters, Andrew Pastura, from Cincinnati, can appreciate the uniqueness of a location like the 200-year-old lock system with its 12-foot drop and narrow causeway.

    “It’s been a quite an accomplishment and great honor to bring wakeskating to the lock system and the Erie Canal of Upstate New York”, says Grubb. “The large drop from one lock to another was bigger than anticipated but being a part of history made it all worth it.”

  • November Project, Aerial Drone (Quadcopter) Footage

    November Project, Aerial Drone (Quadcopter) Footage

    This video comes from Eugene Muzykin, a Boston-based quadcopter pilot and longtime friend of Nerve Rush.

    I’m pretty excited to share my latest project with Nerve Rush.

    I got a chance to film a free and open-to-the-public fitness group called November Project doing their regular Wednesday 6:30 am morning workout. I captured them running the Harvard University Stadium spectator seat stairs. I filmed and edited together a short movie with aerial footage filmed with my DJI Phantom 2 quadcopter which has a GoPro camera attached to it.

    dji phantom 2 quadcopter

    I have been flying quadcopters to make short movies and take photos for about 6 months now.

    I do not have any formal background or education in the film industry or aviation. However, flying quadcopters and getting stable video footage has become much easier with the latest technological improvements in that space. In my setup I am using 3-axis stabilizing system (gimbal) which uses three brushless motors to keep the GoPro camera leveled to the horizon regardless of the movement of the quadcopter. Improvement in batteries have also played a major role in recent surge of a range of quadcopter products coming to the market. After getting a lot of practice, numerous test flights to find best settings and adding FPV (live video preview of the GoPro image) I was able to capture the footage shared here.

    Shooting at the Harvard Stadium was a very interesting experience. I spent a few hours planning what kinds of shots I wanted in this movie clip a few weeks before filming. Normally, sport stadiums are off limits for quadcopters. Stadiums are usually private properties, and quadcopter mid-air failure or loss of control could be very dangerous to spectators.

    Since I was filming at Harvard Stadium, which is usually open to the public, I had less concerns about some of the issues mentioned above. I did take good precaution to ensure safety of the participants of the November Project workout by not flying directly over them. One issue I faced was the possibility of getting shut down by campus police or one of the Harvard Football team managers. From the research I’ve done I was not violating any FAA law or was not in any no-fly zone. However since quadcopters are so new, any official can take matter into their own hands. If I was flying recklessly, getting shut down would have been fully justified without needing a law for it.

    Another challenge I faced was not being sure if the Harvard Stadium field itself was going to be used that morning. If there was a regular football practice going on that day, I would have had to launch from somewhere on the stadium stairs and catch the quad during the landing (no room for a landing otherwise). I practiced catching the quadcopter during landings weeks before I filmed at Harvard for this scenario specifically, but the football practice started late that day and there ended up being enough room on the stadium field for me to launch and land. From the technology standpoint everything went really well. I used 3 batteries for 3 flights to shoot video and one flight to shoot photos. There were some intermittent problems with GPS signal but that’s usually not a necessity for a good flight.

    Overall it was a very fun experience.

    It was a great opportunity to film a very motivated group of people at a really cool shooting location.

  • How to Improve Your Climbing

    How to Improve Your Climbing

    Randi Alegre Climbing CoachAnyone can learn to rock climb and boulder. You don’t have to have crazy upper-body strength, guts of steel and wallet-breaking gear to join the ranks of climbers.

    But for beginners, the sport offers both addictive rewards, getting your adrenaline pumping and letting you enjoy some premium views with interesting people while you’re at it, and a new culture with unique physical and mental challenges. We consulted with climbing experts including Randi Alegre, instructor and youth coach at New York City’s The Cliffs at LIC, to bring you these seven tips for progressing as a climber and having fun in the process. 

    7 Tips to Improve Your Climbing (and to Have Fun Doing it)

    BE PATIENT

    It’s important to remember that in climbing, as in life, the joy is in the journey. It’s true that the goal of any bouldering problem or climbing route is always to get to the top, but don’t cheat yourself out of enjoying all those small hurdles you have to overcome on the way up. Stay in the moment, and not only will you have more fun, but you’ll set yourself up for success by keeping your focus on the move at hand. According to Alegre, if you think too far ahead, “You won’t be ready for the next sequence…and you’ll fail to execute a crucial maneuver.” Solve one puzzle piece at a time and savor each small success.

    At the same time, don’t get discouraged if progress in your climbing is slower than you’d like. Alegre explained that while it’s possible to make speedy gains in strength, your body can’t adapt to the unique demands of climbing at the same rate – “all those muscles you never knew you had and tendons and ligaments you’ve never conditioned.” With practice, you’ll get there. But be patient!

    GET TO KNOW YOUR OWN STYLE

    One of the great things about climbing is there’s no perfect way to do it. Some even call it an “art of self-expression.” It’s all about ascending as efficiently as possible and having fun doing it.

    No one will deny that learning from more experienced climbers is an excellent way to improve your technique and ensure you’re climbing safely, but it’s also true that what works for one person may not work for you, and vice versa. Alegre suggests taking the time to get to know yourself and discover your own rhythm and methodology for reaching the top.

    Climb in as many different settings and with as many different people as possible. For those confined to an urban jungle, see how many climbing gyms you can try out. If you’re lucky enough to have nature at your doorstep, aim to train on various types of crag. Even attempting the same climbing route or problem in a few different ways can help you learn what works for you and what doesn’t.

    improve your climbing

    USE YOUR WHOLE BODY

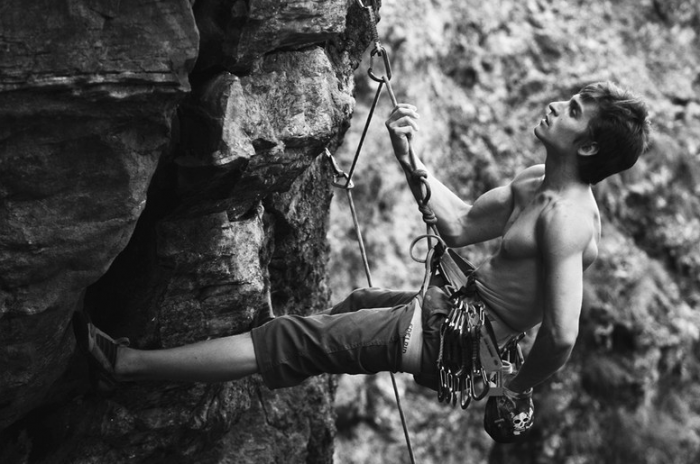
    It’s common for beginner and intermediate climbers to think their arms are the only tools than can pull them up the rock wall. However, letting go of this misconception and learning to trust and use your whole body – “everything from your toes to your nose along with an iron will,” as Alegre put it – is the first barrier every climber has to overcome in order to progress. Alegre introduces his students to the idea of walking up a climb rather than pulling yourself up it. Instead of initiating the upward movement with your arms, practice standing up before you flex your arms.

    When you’re climbing with ropes, learn to let your body rest at comfortable points on a route. When you get to a place with solid holds, rest with your arms stretched straight and knees bent. Then, let one arm go and shake it out. Practice these two moves on easy routes until they become ingrained. You’ll need them to prevent the dreaded pump when you tackle harder challenges down the road.

    TRAIN YOUR BRAIN

    Let’s face it – training your body is non-negotiable in order to improve your climbing. However, focusing on physical conditioning without training your mental game is like trying to climb with long fingernails and clunky shoes. You may find your way to the top, but you’ll likely encounter some unnecessary frustrations along the way.

    Before you even hit the wall, take a moment to mentally map out the route and visualize yourself reaching the top. Train your confidence and build a solid base by practicing on many different types of routes with all kinds of holds. At the same time, some experts say to stick mostly to routes at your level until you feel confident and can climb around 80 percent on-sight. It can be fun to try harder challenges every once in a while to see what the next level feels like, but remember, you’re building a base!

    rock climbing tips

    STAY SAFE

    Before you get vertical, no matter if it’s at the gym or in nature, dedicate yourself to becoming an expert on the proper safety procedures. After all, your life depends on it. Take a course at a gym with a qualified trainer. When you pass the final exam, practice intensely until everything you’ve learned becomes second nature.

    Also, make a point to train with more experienced climbers whenever possible to solidify your knowledge and pick up good habits. In fact, choosing your climbing companions is not something to take lightly. It’s important to climb with people you trust, who motivate you and who you enjoy spending time with to stay safe and have the most rewarding experience possible.
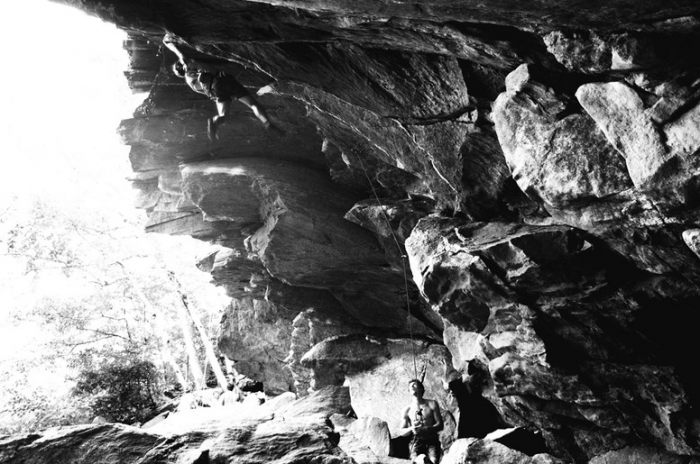
    GET OUTDOORS

    Indoor facilities are great for training, learning, and especially, coming into contact with the climbing community. But nothing will get you more excited and motivated to climb than getting out into nature.

    Whether you’re bouldering or rock climbing, once you’ve mastered the safety procedures and feel comfortable indoors, find a way to get on some natural rock. Don’t let a lack of gear – or company – stop you. Contact your local climbing gym or outdoor retailer to get in the know about local sites, equipment rental and any organized trips that may be on the horizon. Then, pack some water and healthy snacks and make a day of it.

    LEARN THE LANGUAGE

    From the first day you enter a climbing gym, you’ll get the sense you’ve stumbled upon a unique subculture complete with its own way of speaking, moving and interacting. The tribe-like vibe can be intimidating for newcomers, but wander deeper into this world and you’ll find a social, supportive community.

    The first step to feeling more comfortable is getting to know the jargon. Don’t be afraid to ask others if you don’t understand a term or expression – even expert climbers had to start somewhere. For more studious types, online climbing dictionaries on sites like Climbing.com can be useful. Learning the lingo will ease your interaction with fellow climbers on and off the wall. But more importantly, flawless communication is critical for safety, especially when climbing with ropes.

    Another tip for feeling both more authentic and more comfortable when you climb? Invest in a pair of climbing shoes. They don’t have to be on-brand or expensive, but they should fit your feet snugly without making you suffer.

    photos by Randi Alegre

  • Skipopow: High Definition Ski Freeriding

    Skipopow: High Definition Ski Freeriding

    Filmed in HD, this film offers slick point of views and transitions fluidly from skiing to speedflying to paragliding. Boom boom.

  • Eek. Motorcycle Crashes Into Bicycle!

    Eek. Motorcycle Crashes Into Bicycle!

    It’s a common crash on this turn of the famous Mulholland Highway in Los Angeles. Yikes! Both cyclists are OK.

  • How to Plan a Micro-Adventure on Your Bike

    How to Plan a Micro-Adventure on Your Bike

    Last week, my friends Andy Owens and Richard Cammett (accompanied by the lovely Abby Smith — and our two dogs Willow and Ted — in the car) rode bikes from Manhattan to Montreal. The boys were pros, having done the trip from Boston in their college years. I was a total noob, who definitely struggled, but am proof that you don’t need to be a diehard cyclist to plan your own biking adventure.

    I skinned both knees, got some gnarly bruises and even sat out for portions of the trip. But, as they say, you live, you learn. Here’s how to plan your own long distance cycling micro-adventure — minus the physical injuries.

    Step 1. Pick your destination.
    Choosing your cycling destination can be as systematic as a lottery raffle. We headed to Montreal because the boys had already made the trek from Boston several years before. If you want a little more order than throwing darts at a map, consider the following:

    • How long do you have to travel? Are we talking a weekend or a full week off of work? Also, ask yourself if you’d like any rest days and how much time you’d like to spend at your destination.
    • How many miles do you want to log every day? We rode roughly 100 per day (although I cheated and jumped in the car for dozens of miles here and there). I wouldn’t suggested more than 80 for beginner cyclists, but if you’d like to stop and sightsee along the way, you can always bump it down to 50. Then, crunch the numbers and figure out how far you can travel.
    • Pick a place that’s exciting to you for some reason. For us, Montreal was a lively city AND we got to cross the Canadian border (which makes it feel like you’ve logged some serious miles). Maybe you want to head south because you’re a diehard BBQ fan or maybe a band you like is playing in a city a couple hundred miles away. Choosing a destination that excites you is key to making all of your hard work feel worth it in the end.
    (cred: Abby Smith)
    Andy taking a water break (cred: Abby Smith)

    Step 2. Get your gear.
    I started the trip with virtually nothing, not even a bike, meaning I learned the very basics. Before you head out to REI or EMS, determine if you’ll have car assistance or not. Without a car, you’re going for the lightest, most minimal luggage ever (we’re talking dirty cycling shorts every day), but with a car following you, you have a lot more flexibility in terms of what you pack. We were lucky enough to have car assistance. This is the gear we couldn’t have succeeded without:

      • A bike: I’m sure most people interested in pedaling across the country not only already have a bike, but also know a lot more about them than I do. If you don’t, people like these guys can certainly help you out. Here’s what I learned from my trusty pals and my own experience: The lighter, the better (read: carbon fiber). Correct fit counts (ask the workers at the shop to help you with this one). Electronic gear-shifting systems are seriously smooth. And bikes are majorly expensive. I was lucky enough to get a BMC granfondo on loan that fit all of my above recommendations. It was incredibly fast, comfortable and easy to ride. It’s also worth more than my car and WAY out of reach had I needed to buy it myself.
        Cost: About $700 – however many thousands of dollars you’re willing to spend
      • Clip-in pedals: These are those small pedals that attach to cycling shoes. They allow you to pull, as well as push, with each pedal stroke. They’re essential for long distance trips because they distribute your leg power more efficiently and make your pedal rotations much more effective.
        Cost: I spent about $250 on both the shoes and pedals
      • Bike shorts: Trust me on this one. Your butt will thank you later.
        Cost: Around $30
      • Cycling gloves: These prevent blisters from the handlebars. They are 100 percent necessary. Go for lightweight ones with vents if you’re doing a summer ride. Sweaty hands are no fun.
        Cost: Roughly $25 – $50
      • Spare tubes: I packed three spares for our 400-mile trip and didn’t use one. One of the guys, on the other hand, blew through four on the first day. It’s better to err on the side of caution with these.
        Cost: $8 per tube
      • Spare tire: This is wise if you’re riding over a few hundred miles. I didn’t use mine, but one of the guys did. If you’re riding a route without bike shops along it, you probably want to pick one up before your trip.
        Cost: $50 – $70
      • Sunglasses: Not only will these shade your eyeballs from the sun, but they’ll also protect them from wind, bugs, rain and whatever else may be flying through the air. You don’t necessarily need to invest in cycling glasses – just make sure they fit under your helmet comfortably.
        Cost: $25 – $300
      • Either a jersey or saddle bag (or both): These carry your snacks, spare tubes and whatever else you’re bringing along.
        Cost: $40 – $60
      • Helmet: Duh.
        Cost: $50 – $250 

    Step 3. Train. Hard.
    This is the step that I made the biggest mistake on. I definitely didn’t train hard enough. Riding to work is not enough unless your commute is 50 miles. Start small with 15-mile rides and work your way up to the distance that you plan to ride every day on your trip. Also, unlike training for a marathon, at first you’ll want to allow 24 to 48 hours between long rides to let your muscles recover. But eventually, you’ll want to ride long distances back-to-back because that’s what you’ll do on your adventure. I started training about two months before the trip and that was definitely not enough, even with hard training. For a newbie setting out on a 400-miler, I’d suggest at least four months of prep. You may even want to Google around for a set training program (this 20-week one looks pretty legit). Something else that I learned the hard way? Clip-in pedals aren’t as easy as they look if you haven’t used them before so practice ahead of time.

    Our route, Game of Thrones style (cred: Andy Owens)
    Our route, in Game of Thrones style (cred: Andy Owens)

    Step 4. Plan your route.
    Google Maps offers mostly reliable cycling directions, and I’d suggest using this to plan your route. We camped along the way, using sites found at state parks or from this awesome site. You could also stay in hostels, use Couchsurfing or Warm Showers, which is pretty much the cycling equivalent. My one word of advice would be to plan your stops directly along your route. Ten extra miles may not seem like a lot now, but it sure feels like it after you’ve already logged 90.

    Step 5. Pack your grub.
    How you approach this part is pretty personal. We basically lived off of Clif bars and energy gels, with a daily diner lunch. We also packed freeze-dried meals for camping. I always like to cook something that’ll reheat well (in this case, beans, chicken and rice), freeze it the night before the trip and bring it along to heat on a camping stove or fire the first night. That way, you’re not living on Ramen the entire time. Keep in mind that eight hours of cycling burns around 4,500 calories, so pack plenty and keep a couple granola bars on you at all times. Also, account for water, especially if you’re camping at sites without potable water. I filled up my two 20-ounce bottles every 25 miles or so.

    Step 6. Map out breaks.
    Don’t pedal through the miles so quickly that you can’t stop and enjoy the scenery. We stopped after day three of our four-day ride to take a full 36 hours off of the bike seats. Luckily, the boys had a friend from college who worked on a farm in upstate New York. We spent a day weeding crops, feeding pigs and chowing down on her amazing, homegrown meals. I’d highly suggest planning out breaks like these along the way. They make all of those miles more bearable and will often be the most memorable parts of your cycling micro-adventure.

    From right to left: Abby S., Willow, Andy, Richard, me, Ted (cred: Chris Robles)
    From left to right: Abby S., Willow, Andy, Richard, me, Ted (cred: Chris Robles)
  • Badwater Ultra-Marathon: Toughest Run on Earth

    Badwater Ultra-Marathon: Toughest Run on Earth

    It’s an invite-only race and considered the toughest run on Earth. Running 217km – more than five marathons – in the hottest part of the U.S. in the hottest time of year, racers go from the lowest point in the U.S. to the highest point in the continental U.S., the summit of Mt. Whitney. “The shoes have literally melted down through the sole.” Damn!

  • Cliff Diving in Malta

    Cliff Diving in Malta

    Don’t know much about this video clip, but it’s beautifully edited, has a great soundtrack and gets me amped up for cliff jumping. What more could we ask for as adrenaline junkies?

  • Rock Climbing Out of Sight in Fontainebleau

    Rock Climbing Out of Sight in Fontainebleau

    One of the most popular climbing destinations on the planet with thousands of boulders strewn across hundreds of areas, Fontainebleau is a rock climbing playground. In this documentary, watch the world’s best rock climbers explore the hidden and beautiful boulders of this enchanted forest.

  • National Geographic: Mountain Movers Trailer

    National Geographic: Mountain Movers Trailer

    Has anyone watched Mountain Movers on the National Geographic channel? Might be a cool behind-the-scenes look at the kind of work that goes into making terrain parks on big mountains.